Try increasing gamma if dark sections aren't distinguished

Try increasing gamma if dark sections aren't distinguished

Sunday, July 17, 2016

Juno and Winjupos

first kudos to the folks at NASA
perhaps a bit of hubris and over the top nationalism
but it's a pretty impressive feat
they launched the Juno mission to Jupiter in 2011
planning for the deceleration burn to occur as it reached closest approach to Jupiter on July 4th.

they nailed it to the second (despite a 10 light-minute communication lag)
blasting away in the midst of 4th of July fireworks, streaming live from NASA
(though i doubt many watched)
credit for the witty mission name as well.
Juno, who's mission is to peer thru Jupiter's cloud belts, helping to understand it's composition,
is named for the god's wife, known for seeing through the clouds he used to hide his mischief, eg, jovian moons/nymphs


the sci fi book Seveneves, recently recommended to me, takes great pains to get the details of such orbital maneuvers correct. 

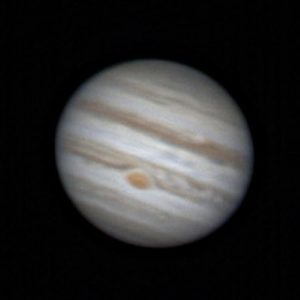
in light of this, here are more of this year's jupiter images


touched on this a bit last year (bottom of post), but one of the problems with imaging jupiter with a mono camera is that it rotates so rapidly that the surface details move between red, green and blue filter images, making for an ugly image:


I used a software program called WinJupos to "de-rotate" the images for the RGB combine.

WinJupos basically projects a circular planetary image onto a sphere, and then allows you to rotate the data on the sphere, and then project it back out as a two dimensional image.  in this way, images taken at different rotational angles can be combined (provided the time stamp, etc. is correct). 

so here's a comparison of an image of Jupiter taken on the same night with a color camera, compared to a mono camera taking individual red, green, and blue filter sequences then combining.  In theory the mono camera has higher resolution:


color camera:


mono camera with color filters:


more dramatic difference than i'd expected, which is a bummer as it takes a lot of work :(


another thing WinJupos allows you to do is combine very long sequences.  more images=better signal to noise ratios, and potentially sharper images.

here's a 1 minute image (very noisy):


and here's a draft of a series of 1 minute images combined (less noise and room for more sharpening):


and here it is after final sharpening (also correction of mirror image flip caused by diagonal, which really irks folks in planetary imaging forums):


this also allows smoother animations of the planet's rotation.  rather than create an animation with a series of one minute images, WinJupos can combine them all
then display the combined data at varying rotations:  

compare the above animation, in which the detail in each image is consistent, to my last animation (below) demonstrating major seeing changes from frame to frame:

lastly WinJupos allows alternative projections, familiar to cartographers, such as this equirectangular view which basically makes all the bands/belts the same length:


or the more interesting polar projection.  

check out the Great Red Spot viewed from the south pole:


looks like the great red spot scooping down into the white zone, leaving a turbulent wake behind it

my goal is to use this technique to capture the hexagon on saturn's north pole, but the weather has not been cooperating this year with clouds almost every night in may/june, then terrible seeing so far in july

my notes 
(which probably only make sense to me) from a recent astronomy club talk on WinJupos are here


imaging details:
celestron nexstar 8 GPS (8" SCT on a wedge)
ZWO ASI120MC/ASI120MM-S
captures with firecapture @ ~200 fps
stacked in autostakkert, Drizzle 3x, combined in WinJupos, then reduced to 1.5x, sharpened in registax 6

Southern California
3/18/16, 3/27/16, 4/3/16

Tuesday, April 5, 2016

monster prom

Interrupting the Jovian parade with a monster solar prominence jutting way off the edge of the solar disk.
This one sat on the edge of the sun all weekend teasing me as I didn't have time for a long video time lapse.
Eventually got a few 20 second captures using a grab and go mount, manually moving the slow motion controls.  

Here's a wide view:


Negative for the filaments:


Close up which reminds me a bit of a ghoul dancing on the edge of the sun:


image details:
wide frame Lunt 60 PT double stacked
close up single stacked
on grab & go tach teegul-azm mount
ASI 120 MM-S camera

Sunday, March 27, 2016

clown nebula, scientific jelly bean pallet

Narrow band imaging is a technique astronomers use to demonstrate the spatial distribution of specific ion emission lines in an astronomical object (usually nebula).  Rather than using red, green and blue filters (which allow relatively broad wavelengths) to construct an image, astronomers use narrow wavelength filters that isolate emissions due to specific ions.  In either case, the digital camera gives a grey scale image (the camera simply counts photons), which is assigned to a specific color in post processing.  For traditional RGB images the choice of color assignments is clear.  But for narrow band images, the imager may record emissions from very different ions which are the same color (as far as the eye can tell).  For example hydrogen Ha, nitrogen NII, and sulfur SII are all red.  If one were to create an image from these filters assigning each to red, the image would convey no information about the distribution of the individual emissions—the data would be lost.  The alternative is to assign several of the emission lines to completely different colors in order to maximize color contrast, making the image more informative re: ion distributions.    The classic “Hubble pallet” assigns SII to red, Ha (also red) to green, and OIII (teal) to blue.  An alternative pallet, often used used by the Hubble team for planetary nebulae, assigns NII to red, OIII (teal) to green, and Helium (royal blue) to blue.  Interestingly the main mission of the Hubble was to image planetary nebulae, but the classic “Hubble pallet” is not used for planetary nebulae.  Here’s a prior post using the classic Hubble pallet.  This technique was initially dubbed “false color” imaging by scientists.  However there was such a visceral public backlash against “false colors” that astronomers (mindful of funding) now use the term “scientifically assigned colors”, a wonderful euphemism.


On coming up with a more meaningful 3 color pallet:
In a previous post on the clown nebula, I discussed the relative contributions of Ha and NII emissions to the image, but used a relatively traditional pallet for the image, assigning NII to red and OIII to teal (the “true colors”).  I subsequently came up with a more meaningful 3 color pallet in order to illustrate the differential Ha and NII emissions (both red): I assigned NII to red, Ha to green, and OIII to blue, then balanced the NII and OIII on the "smile", making it orange.  The net effect was a variation in the color of the NII globules depending on the ratio of NII to Ha with red having more NII, and green more Ha relative to the "smile".  Also note the blue (OIII) section just above the central star, and red NII outer rim of the "nose" upper left.


In more quantitative terms, for the linear images I measured about 200 adu NII in the smile and 700 adu with the 5 nm Ha (Ha+NII), which implies 500 adu Ha, so more Ha signal than NII.  Over all, I find the NII provides more contrast and, arguably, a more interesting image.
Imaging details in previous post.


It also reminds me of jelly beans :lol:

Thursday, March 24, 2016

Double transit and GRS on jupiter

On 3/21-22 Jupiter put on a juggling display
Io, Europa and their shadows crossed Jupiter's face along with the great red spot over the course of a few hours

unfortunately, the seeing was mediocre causing distortions
mid shadow transit, only the double shadows are evident:
ironically, the transiting moons are obscured by the bright surface of Jupiter while their shadows are obvious.


as the moons rotate off to the right edge of the planet,
they become evident casting shadows just before their transits end:


here's the animation of the second half of the show, over ~1.5 hours:


PS i've got confirmation from the amateur community that the GRS has been getting a bit more red since 2012. it's also slowly shrinking according to NASA.


celestron nexstar 8 GPS (8" SCT on a wedge)
ZWO ASI120MC
27x 3 minute captures with firecapture @ 200 fps (exposure limited at 45% histogram with gain 64)
stacked in autostakkert, Drizzle 3x, then reduced to 1.5x
sharpened in registax 6
Southern California
3/21/16
mediocre seeing
Mid(UT): 3/22/16
055902.027

Tuesday, March 22, 2016

jupiter's redder red spot, detail on ganymede

jupiter's up and in prime form right now
here's my first of the season:

might be my imagination, 
but the red spot (which had been fading to tan) 
looks more red to me this year

here's an interesting one i think i neglected to post from 2 years ago look closely at Ganymede transiting the face of Jupiter:

The black dot lower left is the shadow of Io which is further left and below Jupiter.
Just below the shadow, Ganymede is crossing the face of Jupiter.  A close look at Ganymede shows the bottom is white while the top is slightly brown, demonstrating detail on one of Jupiter's moons.  Although not much, I never thought i'd get that from a backyard telescope.

More to come, including an animation of last night's double transit.

details:
nexstar 8 GPS (8" SCT on a wedge)
ZWO ASI120MC
3 minute capture with firecapture @ 50 fps (exposure limited at 95% histogram with gain 64)
stacked in autostakkert, Drizzle 3x, then reduced to 1.5x
sharpened in registax 6
Southern California
3/17/16 fair seeing
Mid(UT)=065303.255

Ganymede transit image from 3/30/2014

Sunday, March 6, 2016

clowning around with narrow band filters :)

I'd planned to image a very faint planetary binned x 4, but felt compelled to shoot something binned x 1 when I realized the seeing was good.
NGC 2392 was the only bright planetary i could think of off of the top of my head
so decided to give it a shot unbinned with the NII filter
so decided to give it a shot unbinned with the NII filter which gave great detail in the reds

NII OIII:
the source of the NII globules is still a bit of a mystery

Kitchen sink pallet--NII red, Ha green, OIII blue, He magenta:


just for fun i gathered a few exposures with a variety of filters (thanks to bilgebay for the 3 nm Ha data):
minimal processing, just digital development, except the last.
note the lack of detail in the OIII, with even less in the HeII
while NII + OIII is remarkably similar to Ha
(bill w's conjecture  Ha~NII+OIII for PN, Ha~SII+OIII for emission nebulae).

Filter digression:
In general, the narrower the bandwidth of the filter, the better the signal to noise ratio (assuming your exposure is long enough to bring out background signal).  I touched on this in prior post covering the rationale behind narrow band filters in light polluted skies.
However, narrower isn't always better.  traditional "Ha" filters typically capture Ha emissions at 656 nm and NII at 658 nm (older papers refer to them as Ha + NII).  The new astrodon 3 nm Ha filters, in theory cut out a portion of the NII signal, which is not desirable when imaging planetary nebulae.

bilgebay recently captured an image with very similar equipment, but used a 3 nm Ha filter (656 nm).
he was kind enough to send me the Ha data for comparison as i was curious to see how much loss of NII signal (658 nm) affected the image.  not quite a perfect comparison as he used >4x the exposure time for his subs, while i probably had better seeing.  you can see the comparison in the mosaic above.  the difference isn't as great as i'd expected, but there is definitely better contrast between the "eskimo's fur" and the circular nebulosity in the broader 5 nm Ha image.

8" LX200R, SX Trius 694 binned 0.4"/px
astrodon 5nm Ha, 3nm OIII, 3 nm NII, chroma 4 nm He
ASA DDM60
Ha 5x5 min, OIII 8x5 min, HeII 14x 5 min, NII 30 x 5 min, L 14 x 1 min
2/11,12,16/16
eastbluff, CA

no calibration except luminance ;)

Ha 3 nm 7 x 20 min
Celestron C8 Edge HD, Atik 460 EX Mono, astrodon 3 nm Ha
Bilgebay Observatory, Mugla, Marmaris, Turkey
interestingly, sedat used also used an 8" SCT with the Sony ICX694 chip.


Sunday, February 21, 2016

Abell 78 where's the helium?

first, a more aesthetically pleasing version in Ha OIII OIII, then the helium:

abell-78-HOO-800w.jpg
Abell 78 is a rare type of planetary nebula who's exhausted central star ran out of hydrogen to burn (fuse) and collapsed, only to reignite--fusing helium rather than hydrogen at it's surface. this is reflected in the unusual shape of the planetary nebula: a smooth outer shell formed initially, followed by a complex inner shell shaped by the much faster helium wind.  note the filaments (not diffraction spikes) streaming from the central star.

faint ring in Ha (hydrogen):
abell-78-Ha.jpg

complex shell with inner jets and stream leading to outer shell (bottom) in OIII (oxygen)
abell-78-oiii.jpg

very faint in Helium II
abell-78-He.jpg

Ha OIII He image
abell-78-HOHe-bright.jpg
with the helium giving not much more than a magenta cast to the outer shell especially upper left

mosaic:
top: Ha OIII He
abell-78-narrow-band-mosaic.jpg
bottom: HOHe HOO HOO (bright)

a number of sources indicate that the inner ring is mostly made up of helium
http://www.noao.edu/...y/abell_78.html
https://en.wikipedia.org/wiki/Abell_78
http://www.astrosurf...78/abell78.html
i am at a loss to explain this as the helium was so faint relative the the Ha and OIII that i had to bin x 4 to pick anything up (this is what prompted the 4x binning further tested in my last post).
the last link also makes the helium claim and includes the 2d spectrum of the nebula, but by my reading, the He line is much more faint than the Ha and OIII.

where is the all the helium? what am i missing?  are they referring to He I? or the central star itself?
any input would be appreciated.


8" LX200R, SX Trius 694 binned x2 to 0.8"/px, binned x4 to 1.6"/px, (final image at .8"/px)
astrodon 5nm Ha, 3nm OIII, chroma 4 nm He
ASA DDM60
Ha 30x20 min bx2, OIII 48x20 min bx2 (best 26 used for RL deconvolution)
HeII 4x20 min bx2, 1x 40 min bx2, 59x20 min bx4
9/23/15-11/14/15
eastbluff, CA